What is Revenue Tracking in A/B Testing? 6 Mistakes While Tracking Revenue + How to Avoid Them
Many ecommerce stores don’t track their sales. If you’re not tracking your revenue, you are flying blind and missing out on a lot of valuable information that can help you improve your business.
Adding a little bit of code to your shopping cart (see what I did there?) can enable you to understand which of your marketing initiatives are driving the most sales.
With revenue tracking, you will be able to understand:
- Which pages on your site are leading to the most revenue conversions
- How people arrive at these “revenue” pages
- Which products have the highest value in your store.
These questions are important because you need this data to allocate resources effectively and make smart decisions.
In essence, you’ll discover which parts of your site are most effective for your marketing and sales funnels – and which ones aren’t beneficial. You might find, for example, that one of your landing pages is leading to a 10% conversion rate while another is underperforming at 10%, in which case you might want to reconsider how you built that landing page.
In this article, we’re going to see what revenue tracking in A/B testing entails, how to set up revenue tracking in your A/B testing tool, and how to avoid making costly mistakes.
Best Ways to Track Ecommerce Revenue in Your Store
Do you want to know how much revenue your store is generating?
With the three methods below, it’s easy to find out.
Learn how to use Google Analytics ecommerce revenue tracking, set up manual revenue tracking, or use Webhooks in your Shopify store.
It doesn’t matter what ecommerce platform you’re on – there’s something for everyone! All of these options will give you valuable data about your store that will help make better decisions.
GA Ecommerce Revenue Tracking
One of the most common ways to track revenue for your ecommerce is with Google Analytics.
This is the perfect solution for ecommerce merchants who already use Google Analytics and want to be able to correlate website usage data with sales data, track their conversion rate by product, category, or billing location and compare it with other marketing efforts to find out what works best for them.
Now, let’s see how you can set up revenue tracking in your A/B testing tool (in this case, Convert Experiences) using Google Analytics ecommerce tracking. It’s easier than it looks!
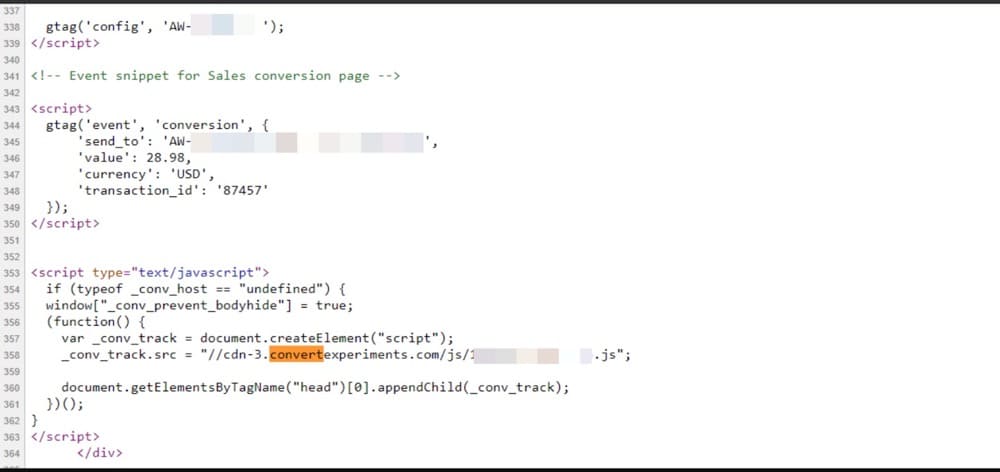
If you paste the Convert Experiments code right after the </title> tag and use the latest standard Google Analytics ecommerce tracking, we will automatically connect the ecommerce revenue tracking feature from Google Analytics to all your tests. There is no need to install anything; this works out of the box for all clients.
1. Create a Revenue Goal with Google Analytics
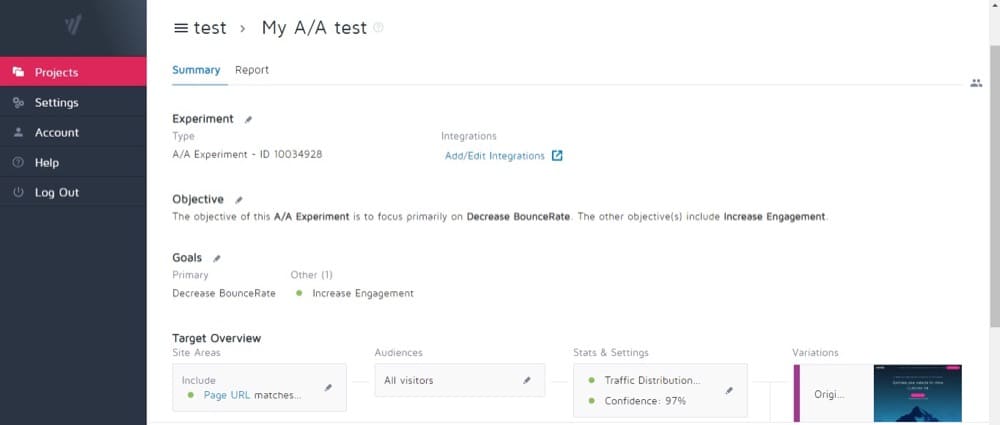
In Convert Experiences, go to your Experience Summary, then the Goals section, and click Edit:
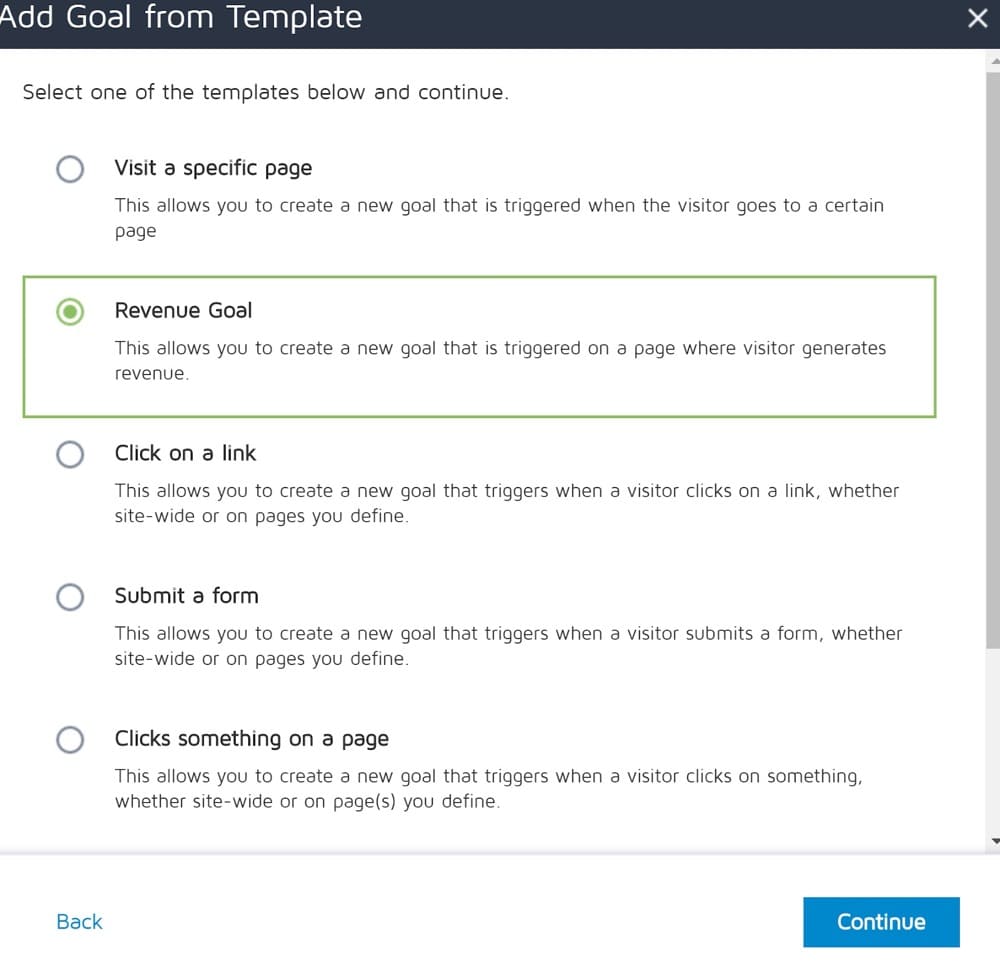
2. Create a Revenue Goal From the Goal Templates in Your Experiment
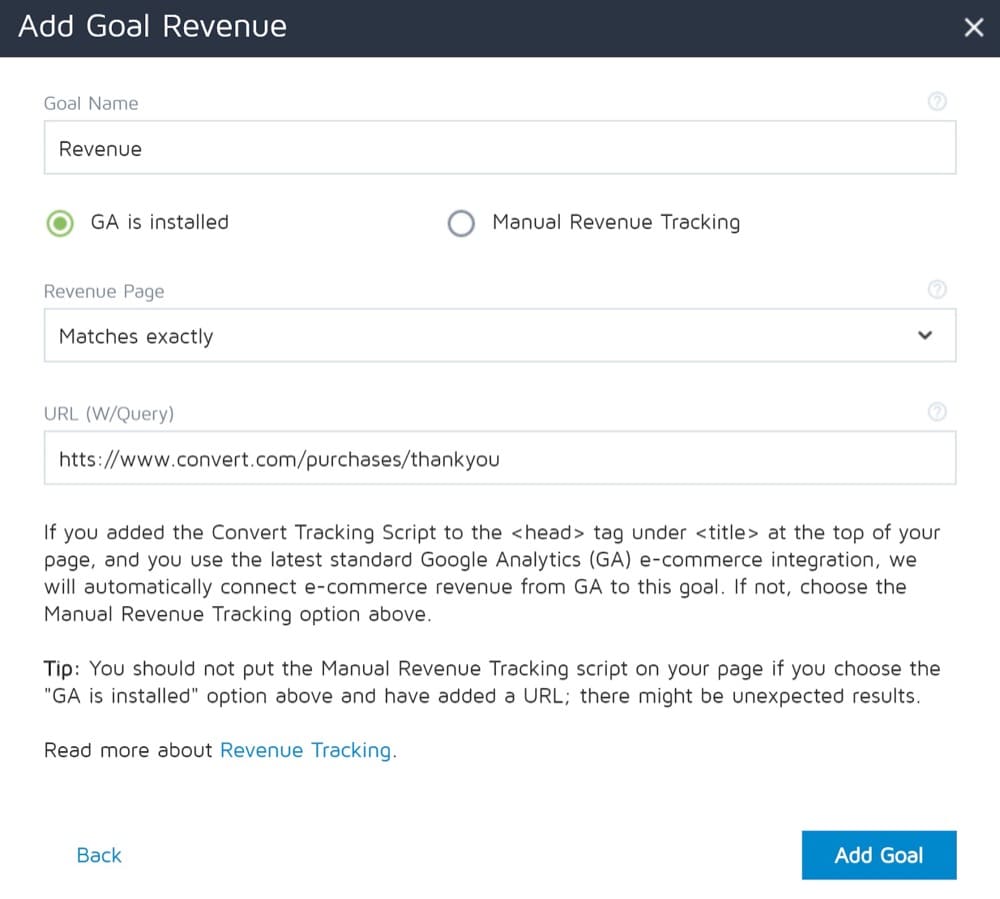
3. Fill In the Goal Name and Page URL to Match the Confirmation Page of Your Purchases
Save it and you are done. This is what the setup looks like:
Manual Revenue Tracking
This method is perfect for any business that doesn’t want to use Google Analytics ecommerce tracking or cannot use it as it’s not implemented through the standard tracking code. You can use it to find out how many products were ordered, how much money was made and more! It’s easy and fast to set up.
1. Create a Revenue Goal
Once again, create a Revenue goal. You can do this from the “Experience Summary” of your experiment:
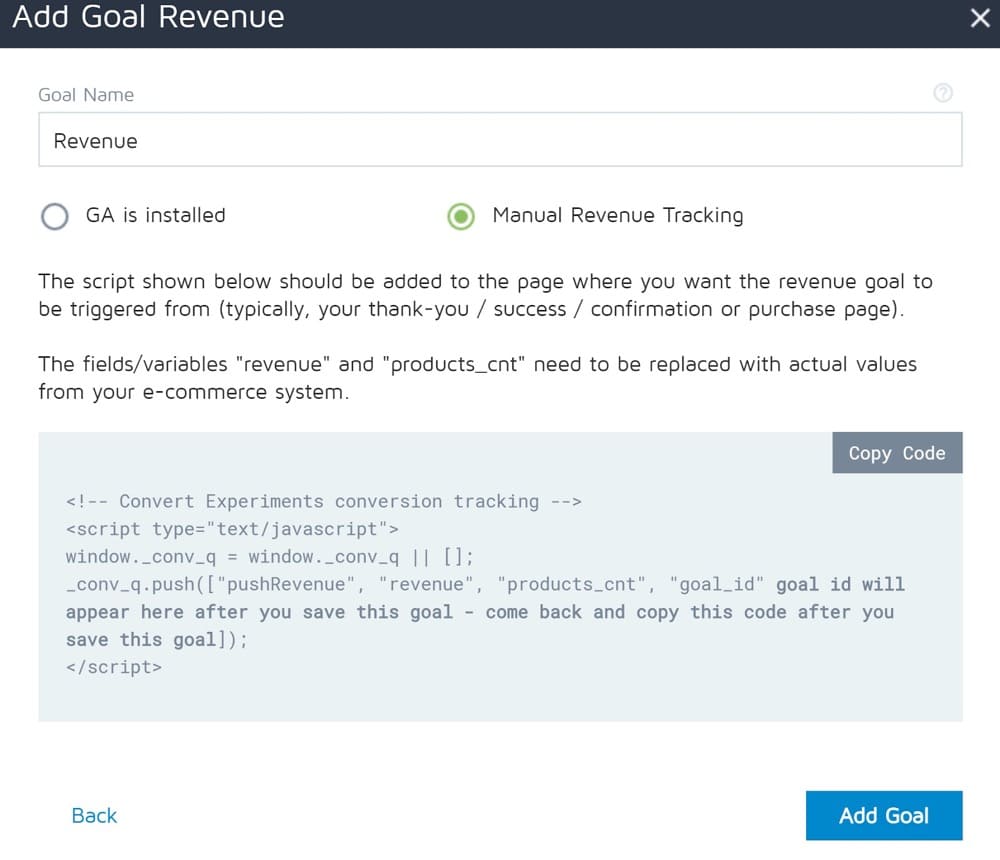
Be sure to pick the Manual Revenue Tracking option:
2. Copy the JS Code into Your Website
After you have saved the goal, go edit it and you will find the JavaScript code below. You will need to copy and paste this script anywhere on the page (after the main Convert tracking code) of your website to send revenue and ordered products count to our system with the appropriate fields mapped to variables on your ecommerce system.
<script>
window._conv_q = window._conv_q || [];
window._conv_q.push(["pushRevenue",revenue,products_cnt,goal_id]);
</script>
In the code above, replace the following fields with the actual values from your ecommerce variables:
- Revenue: revenue using 123.45 (dot as cent divider)
- Product Count (number of products in the cart): products_cnt
- Parameter goal_id is automatically filled in with the ID of the goal once you have saved the goal.
Revenue Tracking in Shopify via Webhook
Shopify store owners, this one’s for you.
Instead of setting up the Google Analytics Ecommerce code or the Manual Revenue Tracking code to capture revenue data from your store, you can use the Shopify Webhook method we explain here.
Shopify Webhook is a feature that allows a website to notify other systems when events happen. For example, when you create a new order, it will help other systems to actively take information from the CRM when data arises. Webhooks can also store that data.
With Webhooks, you will receive push notifications when an event occurs. You won’t need to probe the API to determine whether these events have occurred or not. Webhooks allows you to provide a URL for the webhook provider to send requests to.
This method of tracking revenue conversions is more robust than the manual revenue tracking method of creating a Revenue Goal that tracks the “Thank you” page. The reason being that it is actually triggered when an order is created, rather than when a visitor visits the “Thank you” page.
6 Common Mistakes That Mess up Your Revenue Tracking
The most important factor to consider when measuring your revenue is setting up tracking correctly. However, it’s surprising to see optimizers tend to do these 6 basic revenue tracking mistakes without even realizing it.
The reason tracking can easily go wrong is because setting it up properly requires a mix of technical skills and business knowledge. Marketers and developers tend to lack one of the two.
Below are six costly revenue tracking errors we’ve noticed with our customers and how to avoid them.
1. Ecommerce Tracking Code Is Added to the Wrong Place
Sometimes, you may need to move your scripts around in order to implement new features or improve the speed of a page. This will often stop any revenue tracking codes from firing. This kind of problem cannot be detected by tag-checking tools because all the tracking codes are still there, but they’re not in order, causing all sorts of trouble.
An example of this is “thank you” pages, where the ecommerce tracking code won’t fire if it’s placed above the GA code. If the Ecommerce tracking code is fired before the GA code, the Google Analytics Objects do not initiate to capture data.
So, if you use the manual revenue tracking code method, be sure to copy the manual revenue script after saving the revenue goal. Ensure that this parameter contains the actual goal ID before you add the script to your page. You can use the revenue tracking code above, together with any goal ID from your project; the revenue data will be stored in connection to that goal and a conversion will be recorded for that goal.
2. Not Filtering Out Internal Traffic
This is another common mistake that happens far too frequently.
Most of the time, revenue tracking through A/B testing is used to track how external customers and users interact with your website since internal traffic patterns are typically different from external traffic patterns. When your reporting views contain hit data from both internal and external users of your website, it might become difficult to determine how your customers are actually interacting with your website.
You and your team are likely visiting your website quite often and placing test purchase orders to verify revenue tracking. It may have never occurred to you that these visits and revenue goal conversions are also being tracked by Convert Experiences. When this happens, the data linked to your team’s actions is counted together with the data from all your visitors.
The “standard” way of excluding internal traffic visits is to exclude specific IP addresses. You can find more information on this in this article to either exclude IP addresses on an account level or a project level.
Quick Tip: To find your IP address, run a Google search for: “what is my IP?”
You should see your public IP address listed at the top of the results. Depending on your Internet connection, you may need to check this from time to time. You should also get the IP addresses of any colleagues who will be viewing or making changes to your site on a regular basis.
However, manually excluding IP addresses has a few drawbacks you need to be aware of:
- User IP addresses are constantly changing – Remote workers, especially after the COVID-19 pandemic, are likely to have dynamic IP addresses at home or in small offices. Staff accessing your site via a mobile device will also have a dynamic IP.
- IP addresses can get unmanageable – With an IP address for each user, the amount to manage can get out of control. Forget it if you are going to require more than 20 or so regex filters to capture these. Remember, IP addresses can and do change – you usually receive no warning of this and will likely never know there has even been a change.
Another more efficient way is to use post-test segmentation to temporarily modify your reports and apply them retroactively, rather than excluding IP addresses manually.
Essentially, segments that can be turned on/off on a per report basis are much more flexible than IP exclusion filters which permanently modify your data and only in a forwards direction.
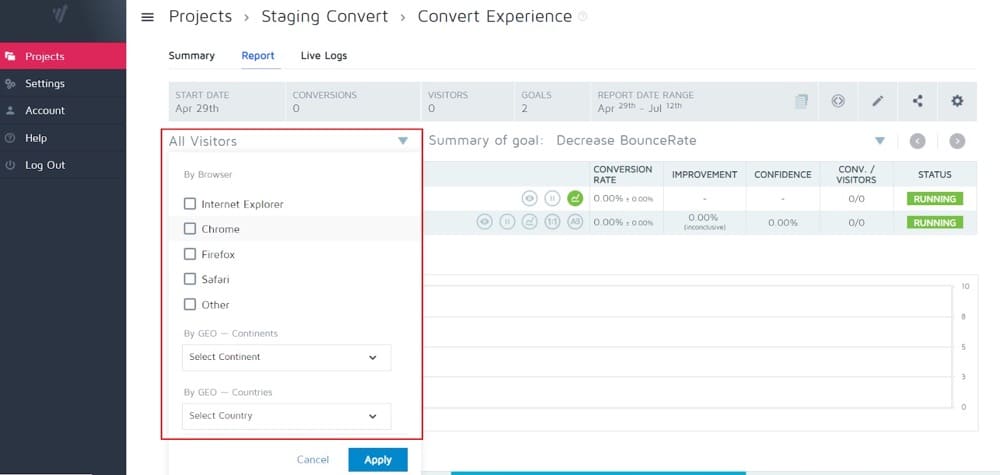
Simply find the conditions that your internal traffic meet (e.g. coming from a specific country and browser) and apply these to your Convert report to exclude the revenue coming from your testing.
3. Firing the Ecommerce Tracking Code Multiple Times
Erroneous repeat transactions inflate revenue, skew attribution reports, and create discrepancies with sales records. They compromise the integrity of your data, threaten the effectiveness of your decisions, and undermine your efforts to foster an accurate data culture.
The primary reason why a repeat transaction gets sent is that the hit carrying the transaction, whether it’s a pageview or event hit, is sent two or more times. Often, the hit carrying the transaction is triggered on page load. If the page is reloaded, the hit is sent to Google Analytics more than once, registering repeat transactions with the same Transaction ID.
The following scenarios are the most likely culprits:
- Returning to the page via an emailed link or bookmark
- Refreshing the page
- Navigating to a different page and returning via the back button
- Restoring the page from a closed browser session or on a phone
The above scenarios can present a challenge as the same transaction data is being sent to GA every time the confirmation page is loaded, meaning that duplicate results may appear in the reports.
Fortunately, this does not happen when data is sent to Convert Experiences as we only track unique transactions per visitor unless specified otherwise (with the force_multiple attribute).
_conv_q.push(["pushRevenue","revenue","products_cnt","goal_id","force_multiple"]);
A way to resolve this is to set a flag once the ecommerce tracking has been set. If the same confirmation page is hit again, ensure that the ecommerce tracking is not sent to GA.
To set a flag for a transaction, you’ll need to add a custom JS condition with a new field (e.g. “TransactionCaptured”).
When the customer sees the confirmation page for their transaction, Convert Experiences will check to see if the “TransactionCaptured” field has been marked for that transaction already. If it hasn’t, the transaction information will be sent to GA and the “TransactionCaptured” field for that record will be marked.
If the customer then refreshes or revisits their transaction confirmation page, the “TransactionCaptured” field will be picked up on, the code which sends the transaction data to GA will be hidden, and therefore GA won’t receive multiple copies of the same transaction data.
If the above sounds too technical for you, you should ask your developers to do the following:
- Make sure a user cannot access the order confirmation page more than once without placing a new order.
- Make sure the user cannot refresh the order confirmation page. If this is not possible, make sure that the revenue tracking code is not implemented on page reload/refresh.
- If you run the same revenue tracking code on your staging environment, there is a possibility that test orders are inflating your sales data. In such cases, make sure not to fire the revenue tracking code on the staging site.
4. Grabbing Values From the Wrong Variables
When using Google Analytics, it is vital to ensure that developers send the correct variable data to ecommerce parameters in GA. If not detected early on, this error will cause a mismatch between the sales numbers in your A/B testing tool and ecommerce Analytics reports.
Many developers make this error when there are several similar variables in the database, so they mistakenly pick the wrong one to send to GA. It can be difficult to detect this type of error if not found during testing. By knowing all of the data fields thoroughly, you will save yourself a headache down the line.
5. Third-Party Checkout Issues
If you are using a third-party checkout, make sure you follow these 4 things:
- Implement the same revenue tracking code (GTM or analytics.js/gtag.js) across both sites.
- Exclude the Referral domain for the checkout page.
- Implement Cross-Domain Tracking (via GTM or analytics.js/gtag.js).
- Use the webhook method for Shopify stores and upsell pages. This integration should be compatible with other upsell and subscription plugins that use the Shopify API to create orders within Shopify. The Convert team verified that this integration can track Recharge Shopify plugin orders.
This will make sure that you don’t count multiple sessions of the same user. You can fire the code when the user completes the transaction & lands on your “thank you” page.
6. Order Outliers Enabled
Sometimes, you may feel that a big order on your ecommerce site throws off your experiment revenue numbers and that you are not getting an accurate picture of the actual sales.
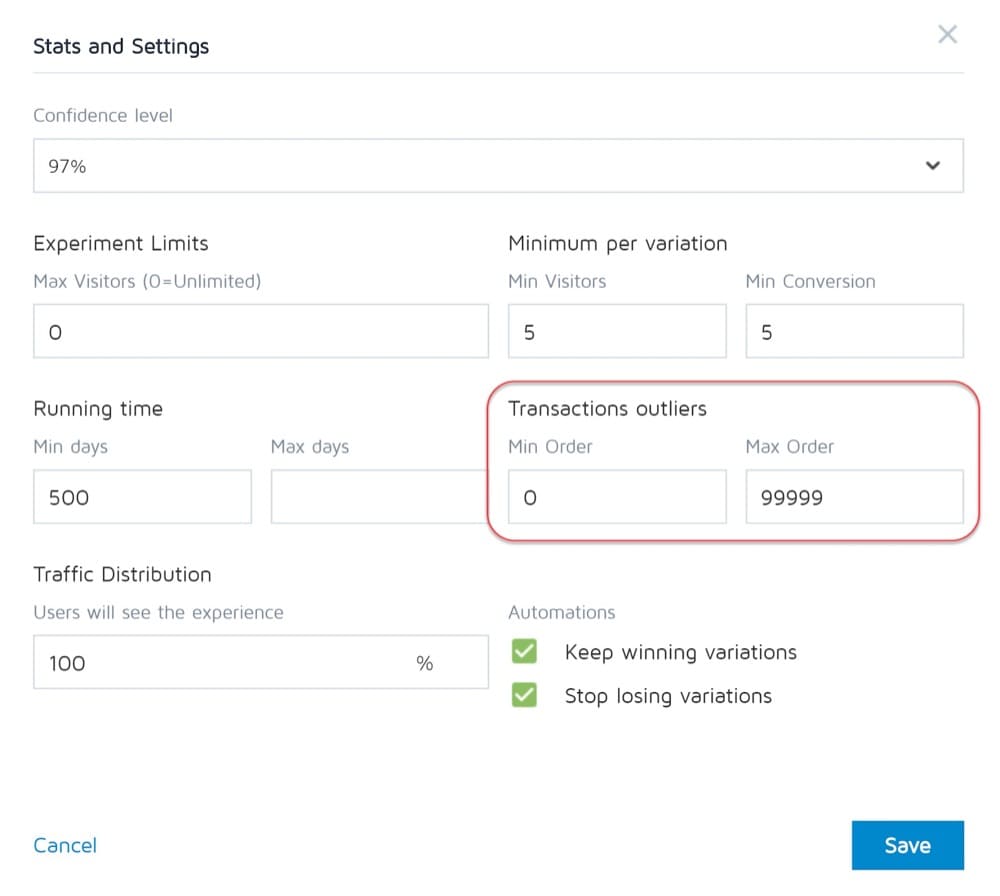
Convert Experiences enables you to disregard certain orders based on amount thresholds you can configure. We call this “Order Outliers“. This setting has to be enabled before the orders are made for them to be included or disregarded. This action cannot be set up retroactively.
However, doing so might cause a discrepancy in your revenue reports as you might forget that you have set it up and won’t understand why your analytics tool and Convert revenue don’t match. So, if you’re enabling transaction outliers, make sure you keep track of it.
Conclusion
One of the most important aspects of running an ecommerce store is knowing what’s driving your revenue. Tools like Convert Experiences can offer valuable insights, but they all start with accurate tracking! There are many things that could go wrong and make your data unusable, so be sure to follow the tips above so you don’t miss out on vital details because something didn’t work properly!
Written By
Dionysia Kontotasiou

Edited By
Carmen Apostu

